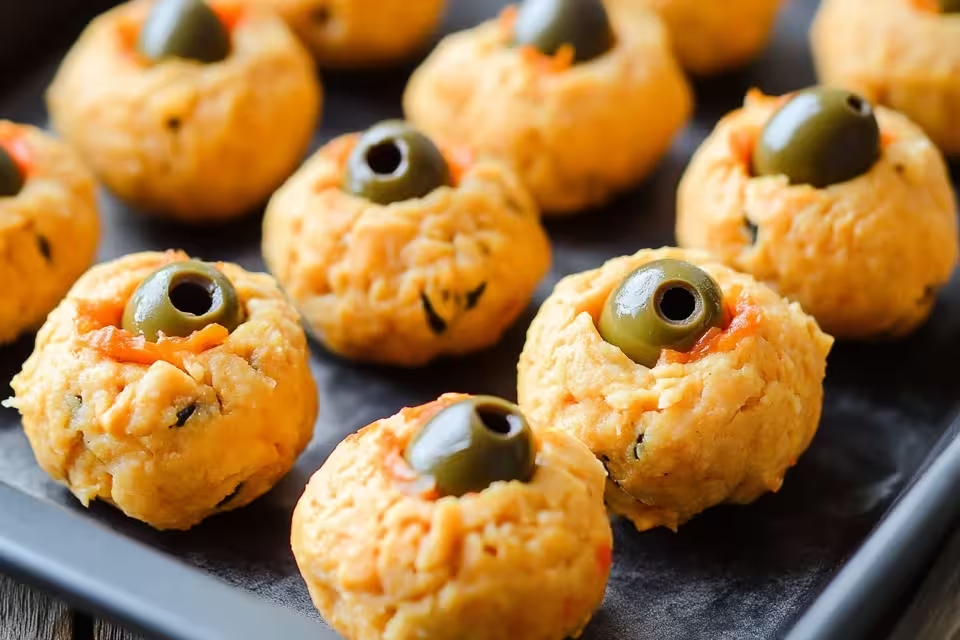
Do you ever find yourself in the kitchen, eyes wide and heart racing, trying to whip up something that both looks and tastes amazing, especially when Halloween rolls around? Well, let me tell you about my favorite festive snack: Halloween Cheese Olive Balls! These cheeky little bites are not just scrumptiously cheesy but also delightfully spooky, making them the perfect addition to your Halloween gathering.
I remember the first time I made these – it was a last-minute decision for a Halloween party. I had little time but plenty of cream cheese and some random ingredients lying around. They were a hit! The kids went wild for the “spiders,” and the flavor won over even the adults. Trust me, these spooky guys are bound to become a crowd favorite at your haunted festivities!
What’s in Halloween Cheese Olive Balls?
Let’s break down the ingredients to understand what makes these cheese olive balls such a joyous treat:
Cream Cheese: This is the creamy base of our balls. I always go for full-fat cream cheese because it creates that rich texture that blends beautifully with the other cheeses.
Shredded Cheese: I prefer using a sharp cheddar for a punch of flavor, but feel free to mix it up with mozzarella or pepper jack if you’re feeling adventurous!
Black Olives: These will be our “spider bodies,” adding a fun creepy element. I tend to grab a can of sliced black olives for convenience.
Chives: These are perfect for creating the spider legs. Fresh chives are definitely the way to go for their mild onion flavor and vibrant color.
Garlic Powder: Ah, my secret ingredient! It adds a delicious depth of flavor. I recommend starting with a little and adjusting to your taste.
Salt & Pepper: Just a pinch of each to enhance all those lovely flavors.
Optional Seasonings: Feel free to get creative! A little paprika or Italian seasoning can really spice things up.
Is Halloween Cheese Olive Balls Good for You?
You might be wondering if these delightful snacks have any health benefits. Here’s the scoop!
Cream Cheese: While it’s creamy and delicious, remember it’s also high in calories and fat. Moderation is key!
Shredded Cheese: Packed with protein, calcium, and oh-so-goodness. Look for low-fat options if you want to cut back a bit without losing flavor.
Olives: Black olives are rich in antioxidants and healthy fats, which can be beneficial for heart health.
So, while these cheese olive balls may not be the healthiest snack on the block, they definitely bring joy and creativity to the table. Just enjoy responsibly, especially during the festive temptations of Halloween!
Ingredients
– 8 oz cream cheese
– 1 cup shredded cheese (sharp cheddar recommended)
– 1 can black olives (sliced)
– Fresh chives (for spider legs)
– 1 tsp garlic powder
– Salt and pepper to taste
– Optional: additional seasonings
*Serves: About 12 small balls*
How to Make Halloween Cheese Olive Balls?
Alright, let’s get down to the delicious making of these spooky bites! Follow these simple steps:
1. **Mix Your Cheese:** In a mixing bowl, combine the cream cheese and shredded cheese. You want it to be creamy and smooth!
2. **Season It Up:** Add the garlic powder, salt, pepper, and any other seasonings you fancy. Give it a good stir so everything is well incorporated.
3. **Shape the Balls:** With your hands, roll the mixture into small balls. Aim for about the size of a golf ball. Get your hands a little cheesy—it’s all part of the fun!
4. **Add the Spiders:** Place a black olive on top of each ball – these will be your spider bodies.
5. **Make the Legs:** Cut the chives into smaller pieces and stick them into the sides of the cheese balls to resemble spider legs. Go wild—you never know what kind of creepy crawlers you might create!
6. **Chill Out:** Pop these in the fridge for a bit to firm up before serving. Trust me, they taste better chilled!
Spooky Serving Suggestions
Got leftover chives? Slice them up and toss them into a salad, or serve the cheese olive balls on a platter with some vegetable sticks or crackers for a more balanced spread. You can also add cheese coating by rolling the balls in crushed nuts or extra shredded cheese for a fun twist.
I can’t wait for you to give these a try! They’re simple, fun to make, and provide endless opportunities for creativity. Make sure to let me know how they turn out! Wishing you a fabulous Halloween filled with fun, spookiness, and plenty of delicious bites!

